Wednesday, December 12, 2012

Tutorial: Scrappy Advent Calendar

Here is the tutorial for the advent calendar I did as part of Ellison Lane's Deck the Halls Series.  My kids have loved using this bright and festive calendar to help count down the days until Christmas...and each morning they wake up begging to "do a pocket."  Frankly, they're adorable, and I love that they love it!


Finished Dimensions:  24.5" x 51.5"
Supplies Needed:
Green Scraps for tree - about a fat quarters worth
Small multi-colored scraps for the garland
Assorted fabrics for pockets - 9" x 4"
1.5 Yards of white background fabric (there will be overage)
1/2 yard binding fabric
 1 Yard Interfacing (I used a very sturdy Pellon 808 Craft Fuse)
Batting and backing fabric - about 30" x 57 " each

OK, let's get started.  First, we're going to make the tree:

Start by grabbing your scraps.
 Begin joining green strips of varying lengths:
 Next, randomly slice the strips into segments. The end result will look great with the lines being askew and random.  Plus, there's the added benefit of not having to line anything up.  Freedom!  This crazy piecing technique is covered well in this book if you'd like to see more in-depth details.
Start to build your tree by adding segments together.
 
Keep building and building...
and building...

until you have a general tree shape.  At several points during this process, you will think to yourself,  "Surely, I am done now - I've been building this tree forever!"  But my friends, I am here to tell you, you will not be done.  Trees take time.  It'll be worth it, though, trust me.  Just keep going.  But it will eventually look like this and you will be done! 
 Trim out a triangle shape for your tree.  I just measured in from the outer edges of each side to the center top and trimmed.  My tree measures 12.5" wide at the bottom and 17" tall, finished.
 Now, I almost left it like this - I loved it so!  But the call of some colorful garland was strong so I forged ahead.  
To make the garland, simply piece together varying width strips of scraps, again with some slightly wonky angles for added visual interest.  This is a great place to use those tiny, special scraps we hang on to - a small piece goes a long way in this project!  Cut the garland strips 1.5" wide.  
 Play with the lay out of the garland pieces until you have it like you want it.
Now.  Let's take a breather.  I am going to ask you to cut your tree.  This may be easy for you.  Or you may sweat a little and have heart palpitations.  Forge ahead - It will all come back together like it's supposed to, I promise.  
                                       
Once your garlands are all in and you have trimmed the edges, it's time to add the tree trunk.  The trunk here is 2 1/4 " x 2 1/2 " , and I added the white background fabric strips 2 1/2" x 8" to the sides.  Center the middle of the trunk with the middle of the tree.
 Next, trim the white edges, even with the tree by extending the angles.  You are now ready to add the white background fabric to the sides of the tree.  I tend to generously cut my fabric, sew it on, then trim down.  It saves me a lot of headache.  So the white fabric I added to the sides of the trees were cut at 31" x 15 1/4 ".
Trim the top overlapping edge even with the angle of the tree so you can add the white panel to the other side of the tree.
 Trim the top to 23" high by 24.5" wide.  Now you can add the bottom white panel which will serve as the background for your pockets.  Cut the bottom white panel 24.5" wide by 27.75" long and attach it to your tree piece.  I forgot to take pictures of this part, but next you sandwich your top with your batting and background fabric.  You are now ready to quilt it!
I chose to quilt straight (ok, straight-ish), closely spaced lines on all the white fabric.  I figured the tree had such crazy piecing that it would stand out a bit if everything around it was densely quilted.  Also, you want the bottom half which will hold your pockets to have a sturdy background as it will get lots of wear, so the tighter quilting should help there.  

OK - are you still with me??  We are almost done, I promise.  It's time for the pockets!  Cut 25 pocket pieces 4" x 9".  These will finish at 3.5" x 4 1/4", as you will be folding them in half.  Cut 25 pieces of the interfacing 4" x 4 1/4" and iron them on one side 1/4 " from the edge like this:
Doing this will help your seam be less bulky when you are stitching the pockets down.  
Next, fold the pocket piece in half right sides together and sew along the two sides, leaving the bottom open.

Now turn the pocket right side out.  I use a Hera marker to get my corners nice and sharp - does anyone else use their Hera marker as a turning tool???  
 Fold the bottom edges in 1/4" ,
 then press.  Repeat with the remaining 24 pockets.  You are now ready to topstitch them into place!

 Center your first pocket 1 inch under the tree trunk.
 Topstitch the pocket into place.  I used a walking foot to keep all those layers from shifting. Also increase your stitch length to 2.8 - this gives a nice finish and again helps with all the layers you've got going on here.
Repeat with the remaining pockets.  I spaced mine an inch apart from each other in all directions.  

Finally, simply add the binding (I added some quick hanging trinagles a la Amy's method) 
And YOU'RE DONE!  YAY!!


 I am so thrilled to have finished this in time to fill these pockets with little goodies to help my little ones countdown to Christmas.  In these pockets they will find treats, clues for treasure hunts, and cards for family fun nights like seeing Christmas lights in our jammies and decorating cookies together.  What a festive time! I hope some of you make your own advent calendar - I'd love to see it if you do!  

This tutorial was originally published here.  I am also linking up with Pink Chalk Fabrics Handmade with Love 2012 - go check it out - tons of fun tutorials posted over there!

Sunday, December 9, 2012

Deck the Halls Winner!


Wow, thank you all for your generous feedback on the advent calendar!  The kids have been waking up immediately begging to "do a pocket."  They've had fun finding little treats and clues hidden in there!  It was also so fun to read about your favorite holiday traditions - I definitely picked up some good ideas to share with my family too!  Y'all are a creative bunch!

My PhotoOK, on to the good stuff - the winner (chosen by random number generator) of the Project Bag made by Lisa of Six Munchkin Stitching is commenter number 84, who is:

     
Every year we take the kids to Candy Cane Lane. They love to see all the decorations & lights and we have to drive the streets multiple times. Thanks for a chance to win! :)


Congratulations Carla!  I know you will enjoy your new project bag - Lisa is so talented!


Thanks again to everyone who participated in the Deck the Halls Blog Hop - tons of great ideas for holiday decor! I wish there was time to do them all.  Sigh...does anyone else feel like there is never enough time to make all the things you want to make?!  

Sunday, December 2, 2012

Deck the Halls Scrappy Advent Calendar


Hi Everyone!  If you're coming over from Ellison Lane Quilts, welcome!  Thanks for stopping by!  Hasn't this been such a fun series?!  Thanks, Jen, for coordinating everything - we're all having a blast!  I had such fun making this Scrappy Advent Calendar, and the kids have already reached into those fun pockets as we've started counting down the days till Christmas.  
Today, we have an exciting giveaway planned for you.  
My Photo
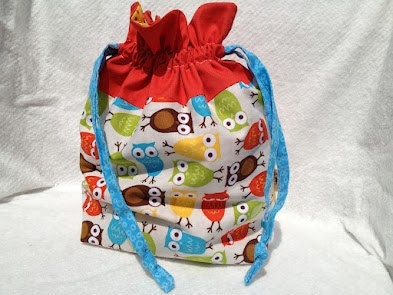
Six Munchkin Stitching is offering to make a project bag for one of my readers!!  Here is an example of one of her project bags - how sweet are those owls?!  
The Project Bag: A fully lined drawstring bag-Ready to Ship
These are lined drawstring bags and will be useful for so many things - I'm thinking it's a perfect knitting project bag! To enter, please leave a comment telling me one of your favorite holiday traditions.  I love hearing about all the fun ways people celebrate!  I'll pick a winner randomly on December 9.  Enjoy!  
And let me know if you plan to make an advent calendar - I'd love to see it!

Tuesday, November 20, 2012

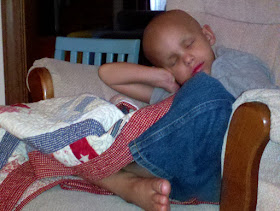
Michael

Oh, my heart is heavy tonight.  This is a picture of Michael.  He is the 6 year old son of my best friend from college - Claudia.  Michael has a neuroblastoma cancer.  It is a horrible disease, with brutal treatments and appalingly low success rates.  Claudia and I have been best friends for over 20 years - the kind of friend you meet in your dorm the first semester of freshman year; who sits next to you in Spanish class so you can split the homework assignments (lo siento sinceramente Senor Rodriguez), who you stay up entirely too late with and then drag each other out the door to class.  We have remained dear friends even though we haven't lived in the same state for almost all of the past two decades.  We have seen each other through schooling, international studies, career paths, family issues, you name it.  We have been with each other through the frogs before finally, thankfully, mercifully finding our princes, she tying the train up on my wedding gown with purple curling ribbon during our reception, and I cutting her veil during her wedding reception after it was, ahem, singed by fire.  Our friendship has deepened as we became mothers (her to 4 and me to 3)  - supporting each other through those crazy sleep deprived days and nights as we learned (and continue to learn!) how to do the most challenging and best job yet - a lifetime of preparation leading to this role.  We have laughed and cried thousands of times over the years. 

So when she called me on Christmas Eve nearly two years ago at 2 in the morning from the hospital with the news that the doctors has found a mass in Michael's abdomen, we cried.  And we prayed.  It has been a non-stop gruelling ride for this sweet family since that night, and they are in a particularly painful part of the journey at the moment.  It is gut wrenching.  I feel a physical ache in my heart for my friend.  I just want to be with them.  I am so thankful for our many, many chats where we can talk about it all, cry, and dare, I say it laugh.  She sent me this picture last fall of Michael curled up in the baby quilt I made his older sister - this is the first quilt I ever made!  I embroidered the words FAITH, HOPE and LOVE on the front.   I could never have known all those years ago as I was figuring out how to make a quilt that it would one day provide warmth and comfort in an unimagiable situation.  It is a small thing to be able to offer, such a little, tiny drop of comfort in an ocean of need/pain, but it is a piece of our shared history that I hope brings a reminder to my dear friends that they are loved. 

I don't know what the days ahead hold, but I do know we will go through them together as always - likely with lots of talking, crying, laughing and praying.  It's what we do. 

Saturday, November 10, 2012

Sweet Winner


The winner of the subscription to the Sugar Block Club is #12.  Congratulations to Caitlin T.!  I know you are going to enjoy what Amy has in store for us!

Tuesday, November 6, 2012

A Sweet Deal

Y'all are in for a treat today!  My sweet friend Amy of Stitchery Dickory Dock, has put together a fantastic block-of-the-month plan to start in the new year that includes both a fun, fresh quilting block AND she's paired it with a recipe for a sweet treat.  Quilting and baking - ahhhh, two of my favorite things!  Something to feed your creative heart and tickle your taste buds all wrapped in one sunny package that will arrive in your inbox each month.

Photobucket
Amy is so full of enthusiasm and encouragement and I just know you'll get a kick out of her.  She's set all this up while parenting 4 little ones - including newborn twins.  I didn't even know my own name for the first 6 months after my twins were born!  I think this is a fantastic deal, and would make a great stocking-stuffer gift for the quilter in your life.  Click the button below to sign up!
                                                     
Of course, you could just win one!  Amy has generously offered to give one of my readers a year long subscription to the club.  To enter the giveaway, please leave a comment on this post - as always, my followers can leave an extra comment for an extra chance to win.  I'll randomly pick a winner this Friday.  Good luck!
ETA:  Comments now closed.

Wednesday, October 31, 2012

Blogger's Quilt Festival


Sneaking in under the wire here to participate in Amy's awesome online quilt show that she hosts twice a year.  I thought I'd share a mini-quilt I made for the Post Sewing Summit Swap last fall.
Rainbow Spotlight 
Measures 24" x 24"
Quilted by Valerie Luberecki 
Special Technique:  Inset Circle
"Best Category" :  ROY G BIV, Mini Quilt, Scrap Quilt

Here's a close-up of the scrappy strip piecing:


Enjoy the rest of the quilts on display over at Amy's Creative Side!

Monday, October 22, 2012

Have You Heard???

Check this out! My friend Jennifer has planned an amazing event that you won't want to miss!


Sew South is a modern sewing retreat where you will sew, create, learn, play and connect with other modern sewists and bloggers. 

Sew South is a boutique retreat, big on substance and style but small in size for a wonderful, personal experience. 

It's a place to be inspired, relax and learn something new. Come spend a weekend sewing, laughing, and creating. A spring weekend in the South sewing with friends, taking time for yourself, finding your inspiration- that's the Sew South Retreat.

What's included?
  • 4 Make & Take workshops including quilting and paper piecing, bag making and garment sewing taught by experienced sewists and bloggers
  • plenty of open sewing time
  • a fabric field trip to The Little General in Winston Salem, NC
  • a cocktail reception
  • breakfasts, lunches and snacks during the retreat
  • fabric and goodie swaps
  • opportunities to connect with other modern sewists and bloggers
  • a swanky swag bag
Sew South is March 21-24, 2013 in Charlotte, North Carolina
Come be a part of our inaugural year! I hope you'll join us! 

Tickets  are $275 and go on sale on Wednesday, October 24 at noon, EST. 
This retreat is limited to 50 people so don't miss out!

Are you going???


Sunday, September 30, 2012

THROW

Remember this quilt??

Well, it's currently hanging in Union Art Gallery in Wisconsin!  I was contacted over the summer by the gallery manager asking if Racing Stripes could be included in a show for their fall line-up.  The exhibit is called, Throw: Great Lengths of Innovation in Modern Quilting.  So, I slapped on a label...
...then packed it in a bunch of bubble wrap... (thanks for the tip, Jacquie! - less wrinkled when it's unpacked from the box - brilliant!)
                                               
...And then prayed like crazy it would arrive where it was supposed to!  I emailed the gallery manager when I shipped it and said I felt like I had just packed up my baby in a box and handed it over to a complete stranger!  I even dreamed that it got laid down in a puddle of bleach right before the show and had these big splotches all over it.  Can you imagine?!  But the folks over at Union Art Gallery in Milwaukee, Wisconsin, have been so wonderful to work with, and have really handled everything so professionally.  If you'd like to take a look at what else is in the gallery, click on this link for a 360 view of the exhibit.  As you can see, Racing Stripes is in good company, including Quilt Con instructor Sherri Lynn Wood's curved masterpiece. Her work AMAZES me, and I so hope I get the chance to meet her at the conference in February.  

And in case you are interested, here is a copy of the press release they sent out about the exhibit:


_______________________________________________
            Throw: Great Lengths of Innovation in Modern Quilting
UWM Union Art Gallery shows work by 7 national quilt and mixed media artists


MILWAUKEE, WI (September 7, 2012)—The UWM Union Art Gallery will show a collection of 7 fiber and mixed media artists in their 2nd fall exhibition Throw: Great Lengths of Innovation in Modern Quilting. The exhibition will run from September 21st through October 12th. The opening reception will take place on Friday, September 21st from 5-8pm, with a lecture given by Maura Ambrose, founder of Austin-based quilting company Folk Fibers, at 7pm.

The artwork represented will range from traditional quilts with a dye-farm-to-sewing-table modern twist (Maura Ambrose, Austin TX), to mixed media masterpieces of aluminum and steel with quilt aesthetic references (Greely Myatt, Memphis TN) and everything in between. The group exhibition includes artists from across the map: Maura Ambrose (Austin, TX), Sherri Lynn Wood (Oakland, CA), Julie Floersch (Oakland, CA), Greely Myatt (Memphis, TN), Cindy Friedman (Merion, PA), Kit Lang (Toronto, ON), and Valerie Luberecki (Raleigh, NC).

Throw seeks to expose the Milwaukee design audience to the forefront of innovation in modern quilt composition. As the resurgence of craft continues in the US, design aficionados are fortunate to witness the inspired movement of modern quilting. Innovative piecing and quilting methods, collaborative interpretations of the medium, and a sublime deviation from the shackles of tradition all inform the modern quilter. The works included in Throw are true graphic design triumphs with tangibility. These modern quilt designs will wake the sleeping memory of your favorite bedclothes with vivid style in form and function.

“It is truly an exciting time to be a quilter,” says Molly Evans, manager for the Union Art Gallery. “Innovation and the exchange of ideas and quilting methods is becoming widespread thanks to the ease of communication channels of our time. Challenges to the ‘traditional’ means of the medium are becoming celebrated rather than disregarded. We are beyond thrilled to host 25 examples of the modern quilting medium.”

Throw will be shown through Friday, October 12th at the Union Art Gallery. For private group tours outside of gallery hours, or to arrange a quilting bee inside the gallery contact Molly Evans @ evans44@uwm.edu for more information. 

_________________________________________________________________________________

I feel so thankful to be included with this talented group and organization, and once again am reminded of the thrill of how form and function unite in modern quilting.  Makes me wanna go cut up a bunch of fabric and sew it back together again...

Sunday, September 23, 2012

On Color

Let's chat about color, shall we??  I love color - all of it.  Really, I do.  I love the brights, the softs, the subtles, the neutrals - which kind of makes it hard to narrow it down to one palette when I'm, say, decorating a room in a house.  I fall in love with one group of colors, but then feel locked in.  But with quilts - quilts! - I can make them again and again and again in limitless color groupings.  It never gets boring!  And, like most quilters, I see quilt inspirations wherever I go, in all kinds of everyday objects.  I thought I'd just share a couple of things that caught my eye lately and pull fabric from my stash that would make a quilt in that palette.
First up, my daughter (quite the little 4 yr. old artist herself) loves to play with my supplies while I'm sewing.  She arranged these buttons the other day and I had to snap a picture.  Love!

 And here are the fabrics I thought went well with the buttons...
 
Next up, we have my son's hackey sac, also doubling as an indoor soccer ball these days: 

(Look at that dark green!  I never would have thought to have added that with the orange and teals, but it looks great !)
And here is the fabric stack it inspired:
 There's color combinations everywhere you look.  Here are just a couple more from around my house, all just begging to be used in quilts.  I'm only happy to oblige :).


So tell me, where do you get your color inspiration???